Setup D-Link DVG-5402SP with Comnet SIP service
D-Link DVG-5402SP is an ATA unit to bridge VoIP (SIP) signal with traditional analog phones. I can enjoy low monthly fee while retain all my existing analog phone investment and network.
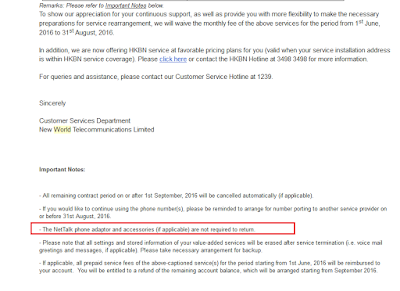
My D-Link came with 新世界 New World Telecom's VoIP (NWT SIP) NetTalk service plan. NWT will terminate this service at 31-Aug-2016. The termination letter also pointed out that the ATA unit will not be collected, why don't we re-use it with other VoIP provider in Hong Kong?

The below example is a setup procedure to turn the ATA to support Comnet Internet Phone service. There is also a YouTube video describing how to do setup:
如何設定新世界NetTalk的D-link DVG-5402SP路由器轉用ComNet Phone
My D-Link came with 新世界 New World Telecom's VoIP (NWT SIP) NetTalk service plan. NWT will terminate this service at 31-Aug-2016. The termination letter also pointed out that the ATA unit will not be collected, why don't we re-use it with other VoIP provider in Hong Kong?

The below example is a setup procedure to turn the ATA to support Comnet Internet Phone service. There is also a YouTube video describing how to do setup:
如何設定新世界NetTalk的D-link DVG-5402SP路由器轉用ComNet Phone
- Login to ATA's admin page.
- Case 1:
Internet <--> Wifi Router <--> D-link ATA
<--> My computer
If the ATA is behind my broadband router, i.e. ATA WAN port connect to my router's LAN port), assume my router assign 192.168.1.x to the ATA, then enter http://192.168.1.x:8080.
(If you are not sure what IP is assigned to D-Link ATA, please go to your router admin page, and check DHCP leases). - Case 2:
Internet <--> D-link ATA <--> My computer
If you use D-Link ATA to connect to Internet directly, you may enter
http://192.168.15.1 (default IP) - The admin page is tested with IE 11.
- Login as admin. The admin password is at below:

- (Optional) At Maintenance – Backup and Restore, backup the current settings before proceed.

- (Optional) The default admin page timeout is too small. It is safe but very inconvenient. Change the default timeout of web admin from 60 seconds to 3600 seconds (or any suitable timeout).

- [IMPORTANT-SECURITY ISSUES] For those who use this ATA to connect to Internet directly, please disable "Enable Web UI from WAN" and "Enable Telnet Service". This is a security hazard!
Of course, you should change the default user and admin password!
Click "Apply" to save the settings. - To prevent the ATA from loading default settings from NWT, please disable "Auto Provisioning", stopping auto update from NWT as shown below. Under Maintenance - Provision, clear all check boxes.

Press "Apply" to save the settings. - We need to enter the SIP username and password here.
Enter Setup – VoIP setup, under Phone 1 – FXS, enter your SIP username and password as below:
For Comnet, the username is usually 852******** (total 11 digits, refer to your email received).
If you do not know your SIP password, you can reset at Comnet's password reset page. Usually the password will be sent via SMS in 10 minutes.
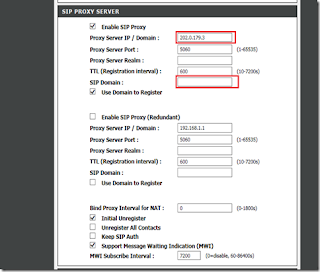
Enter the SIP server IP of Comnet. Clear the SIP Domain.
Press "Apply" to save the settings. Please wait a few second for the message "Now settings will take effect after rebooting." to appear.
- Under Advanced – VoIP – SIP Advanced, change the RTP Starting Port UDP from "9000" to "8000".

Click "Apply" at the bottom to save. - (Optional) By default, the ATA uses NWT DNS server. You may want to use DNS IP address from your ISP or your router. This can be changed at Setup – Internet Setup.


Click "Apply" to save.
Remember to wait for the "New settings will take effect after rebooting." message appear. - (Optional) The digit map of the ATA is already preset with HK numbers. If there is other numbering changes in HK (e.g. use 4xxx-xxxx fixed line number), we need to update this table. The menu is under Advanced – VoIP – Digit Map.

- The last step is to reboot the device to make all changes effective. Go to Maintenance - Backup and Restore, then click "Reboot".

The reboot usually takes less than 1 minutes. - [VERIFY] After re-login, go to Status – VoIP Status, and to check if "Proxy Register" status is "Successful". Then you can make some inbound and outbound test calls.

Comments
今晚試試