Synology Tricks
- Install Community App Store
# ssh to your NAS first
sudo -i
mv /etc/ssl/certs/ca-certificates.crt /etc/ssl/certs/ca-certificates.crt.bak
curl -Lko /etc/ssl/certs/ca-certificates.crt https://curl.se/ca/cacert.pem
- SynoCommunity Packages
- FFMPEG - solve cannot covert to mpeg4 issue
- PPTP Server
- On Package Manager, add "VPN Server"
- Enable PPTP Server
- On Firewall, add port forward for TCP 1723
- Install Windows 10/Windows 2016 on Virtual Machine Manager (VMM) on DSM 6.2.3
- In Virtual Machine page, click "Create".
- Operation System - choose "Others" for Operation System. Then click Next.
- Storage Location - click Next to confirm the storage location.
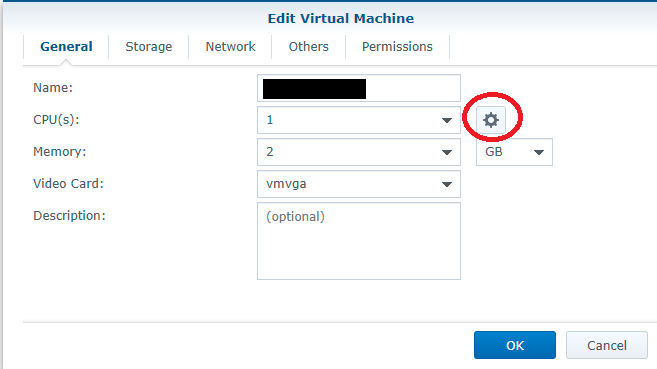
- General Specification -
- Select 2 CPU and 2 GB of RAM.
- For Video Card, use vga. Click Next.
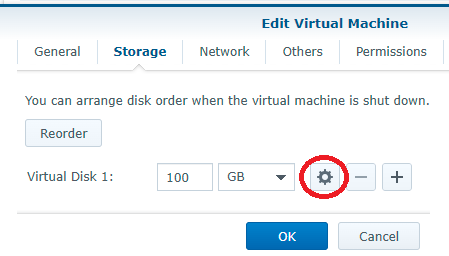
- Storage - Create a disk of at least 11GB. Click the Gear icon. Select "VirtIO SCSI Controller". Then click OK. Click Next.
- Configure Network - For network card, click the Gear icon and change the model to "virtio". Click OK. Click Next.
- Other Settings -
- For "ISO file for bootup", please select or browse your Windows ISO.
- For Additional ISO files, please select "Synology_VMM_Guest_Tool_xxx"
- For Firmware, please change to "UEFI". Click Next.
- For CPU, in advanced option, disable "Enable Hyper-V Enlightenments"
- For Assign Permission, please select per your requirement and click Next.
- On Summary Page, click "Apply" to finish the VM creation.
- You should then power on the VM and perform normal OS installation.
- Install Windows XP on VMM
- Prepare - The VMM_Guest_Tools provied by Synology has no Windows XP support. Please download oVirt-toolsSetup-4.1-5.fc24.iso from ovirt.org.
- Details for VM creation
- Operation System - user "Others"
- CPU - 2 CPU
- RAM - 1GB
- Harddisk - 10GB (VMM's minimum). Use "IDE Controller" for Virtual Disk Controller Type (click the Gear icon)
- Network - user "virtio" for model.
- Additional ISO file - browse to oVirt-toolsSetup-4.1-5.fc24.iso you just downloaded.
- Firmware - Legacy BIOS
- OS installation - perform OS installation as normal.
- VM Guest Tools installation
- Go to E:, run ovirt-guest-tools-setup.exe.
- After running this tools, all the device drivers can be recognized except VGA.
- Limitation - there is no way to find a VGA driver.
- Synology + Zerotier (non-docker solution)
- Enable Synology bridging/NAT
- ssh to server (you can enable SSH in Synology Control Panel - Terminal)
- edit /etc/sysctl.conf, add/update below lines:
net.ipv4.conf.all.forwarding=1
net.ipv4.conf.default.forwarding=1
net.ipv6.conf.all.forwarding=1
net.ipv6.conf.default.forwarding=1 - Apply changes:
- sysctl --system
- Enable iptables
(ovs_eth0 is my original LAN. eth50 is the interface created by Zerotier. Please use "route" command to check your interface name)sudo -s /sbin/iptables -t nat -A POSTROUTING -o ovs_eth0 -j MASQUERADE /sbin/iptables -A FORWARD -i ovs_eth0 -o eth50 -m state --state RELATED,ESTABLISHED -j ACCEPT-j ACCEPT
/sbin/iptables -A FORWARD -i eth50 -o ovs_eth0 - Persistent - create a boot-up task in DSM
- Login to DSM
- Control Panel - Task Scheduler
- Create - Triggered Task - User-defined Script
- Under "General" Page
- Task Name - iptables
- Event - keep the default (Boot-up)
- Enabled - check the box
- Under "Task Settings" Page
- copy the script to textbox of User-defined script
- Press OK.
- Reboot DSM to test out
- register at https://my.zerotier.com/, get the network ID
- Under Advanced - Managed Routes
- add a static route:
- Destination = your local LAN IP address range e.g. 192.168.0.0/24
- (via) = your Synology local LAN IP e.g. 192.168.1.2
- (Optional) You may need to add 0.0.0.0/0 via 192.168.1.2 if you want to route all traffic on Android via mobile network
- better to set an static IP for your synology
- Manually install package in Synology
- Package Center - add the package via the Manual Install Button
- Download spk package file at: Index of /RELEASES/1.8.3/dist/synology/ (zerotier.com)
- Open Zerotier app
- Enter network ID
- Allow device connection in Zerotier
- Allow both Synology and your mobile device to connect
- better to set an static IP for your Synology
- Reference: Using Synology as a ZeroTier Bridge (homeops.tech)
- Docker
- File System Check on DSM6
https://github.com/OliPelz/how-to-fsck-on-synology-dsm6
https://johanneshertel.wordpress.com/2015/07/03/unmounting-volume1-and-fixing-low-level-file-io-error-on-synology-nas-and-probably-other-linux-based-fileservers/ - Synology CLI Cheatsheet
https://github.com/wuseman/Synology - Service Control
- List Service:
synoservice --status
synoservicecfg --list - Stop Service
- synoservicecfg --hard-stop synoindexd
- Start Service
- synoservicecfg --hard-start synoindexd
- Restart Service
- synoservicectl --restart synoindexd
- Critical Service to avoid:
synoovs-db


Comments